The Complete Guide to Door Measurements: Everything You Need to Know
Whether you’re a homeowner planning a renovation, a contractor working on a new build, or a DIY enthusiast tackling a door replacement project, understanding door measurements is crucial for success. Getting measurements wrong can lead to costly mistakes, installation delays, and doors that simply don’t fit properly. This comprehensive guide covers every aspect of door measurements, from standard interior doors to specialized installations like garage doors and storm doors.
Why Accurate Door Measurements Matter
Proper door measurements ensure your doors fit correctly, operate smoothly, and provide adequate security and insulation. Incorrect measurements can result in gaps that compromise energy efficiency, doors that don’t close properly, or expensive modifications to door frames. Understanding the difference between rough openings and finished openings, as well as the specific requirements for different door types, can save you time, money, and frustration.
Essential Tools for Measuring Doors
Before diving into specific measurement techniques, ensure you have the right tools:
- Steel measuring tape (at least 25 feet long)
- Level (2-4 feet recommended)
- Pencil for marking
- Notepad or smartphone for recording measurements
- Flashlight for examining dark spaces
- Square for checking right angles
Standard Door Measurements: The Foundation
Standard door measurements form the backbone of residential construction. In the United States, interior doors typically follow these standard dimensions:
Height: The most common door height is 80 inches (6 feet 8 inches). However, 8-foot doors (96 inches) are becoming increasingly popular in modern construction, especially in homes with higher ceilings. Some luxury homes feature 9-foot doors (108 inches) for dramatic effect.
Width: Standard door widths include:
- 24 inches (rarely used, mainly for closets)
- 28 inches (small spaces, closets)
- 30 inches (standard for most interior doors)
- 32 inches (common for main bedrooms, accessible design)
- 36 inches (standard for front doors, wide hallways)
Thickness: Most residential doors are either 1⅜ inches or 1¾ inches thick. Interior doors typically use 1⅜ inch thickness, while exterior doors commonly use 1¾ inch thickness for enhanced security and insulation.
The Americans with Disabilities Act (ADA) requires a minimum clear width of 32 inches for accessible doorways, though 36-inch doors provide more comfortable passage for wheelchair users.
Interior Door Measurements: Room by Room Considerations
Interior doors serve different purposes throughout your home, and their measurements may vary accordingly:
Bedroom Doors: Standard bedroom doors are typically 30 inches wide and 80 inches tall. Master bedrooms often feature 32-inch or 36-inch doors for a more luxurious feel and easier furniture movement.
Bathroom Doors: Most bathroom doors are 28 or 30 inches wide. The smaller width works well for most bathrooms while preserving valuable floor space. However, ensure the door provides adequate privacy and can accommodate any mobility aids if needed.
Closet Doors: Walk-in closets typically use 30-inch or 32-inch doors, while reach-in closets might use bifold doors or sliding doors to maximize space efficiency.
Pantry and Utility Doors: These functional spaces often use 28-inch or 30-inch doors, though larger pantries might benefit from 32-inch doors for easier access with shopping carts or large items.
When measuring for interior door replacement, measure the existing door frame’s width, height, and depth. Also measure the door itself to ensure you’re ordering the correct size. Remember that the actual door will be slightly smaller than the frame opening to allow for proper operation.
Sliding Door Measurements: Space-Saving Solutions
Sliding doors offer excellent space-saving benefits and come in various configurations. Measuring sliding doors requires attention to both the door panels and the track system.
Standard Sliding Closet Doors: These typically come in pairs with each panel measuring 24, 30, or 36 inches wide. The total opening width would be 48, 60, or 72 inches respectively. Standard height remains 80 inches, though 96-inch heights are available.
Pocket Doors: These doors slide into a wall cavity and require precise measurements of both the door opening and the wall space. The rough opening width should be twice the door width plus additional space for the track mechanism. For example, a 30-inch pocket door needs approximately a 64-inch wide rough opening.
Bypass Sliding Doors: These doors slide past each other on parallel tracks. Each door panel typically overlaps the other by 2-3 inches when closed. Measure the full opening width and divide by two to determine individual panel sizes.
Sliding Barn Doors: Interior barn doors have become increasingly popular. The door width should be at least 6 inches wider than the opening to ensure complete coverage when closed. Standard heights are 80 or 84 inches, with hardware mounted 1-2 inches above the door.
Sliding Glass Door Measurements: Connecting Indoor and Outdoor Spaces
Sliding glass doors, also called patio doors, require careful measurement due to their size and weight. These doors connect interior living spaces with outdoor areas and must provide excellent weatherproofing.
Standard Sliding Glass Door Sizes:
- 5-foot doors: 60 inches wide × 80 inches tall
- 6-foot doors: 72 inches wide × 80 inches tall
- 8-foot doors: 96 inches wide × 80 inches tall
- 9-foot doors: 108 inches wide × 80 inches tall
- 12-foot doors: 144 inches wide × 80 inches tall
Three-Panel Configurations: Some sliding glass doors feature three panels, with two stationary panels and one sliding panel, or two sliding panels and one stationary panel. Common three-panel widths are 9 feet and 12 feet.
Measuring Considerations for Sliding Glass Doors:
- Rough opening should be 1 inch wider and ½ inch taller than the door frame
- Consider the floor level difference between interior and exterior
- Account for weatherproofing materials and sill pans
- Measure diagonally to ensure the opening is square
- Check for plumb and level conditions
Installation Clearances: Sliding glass doors require specific clearances for proper operation. Allow at least 1 inch of clearance above the door frame for settling, and ensure the floor is level across the entire opening width.
Garage Door Measurements: Size and Functionality
Garage doors come in various sizes to accommodate different vehicle configurations and storage needs. Accurate measurement is critical because garage doors are among the largest moving parts of your home.
Single Car Garage Doors:
- 8 feet wide × 7 feet tall (most common)
- 8 feet wide × 8 feet tall
- 9 feet wide × 7 feet tall
- 10 feet wide × 7 feet tall
Double Car Garage Doors:
- 16 feet wide × 7 feet tall (most common)
- 16 feet wide × 8 feet tall
- 18 feet wide × 7 feet tall
- 18 feet wide × 8 feet tall
Measuring Your Garage Opening:
- Width: Measure the inside width of the garage opening at the widest point. Measure at both the top and bottom to check for variations.
- Height: Measure from the floor to the bottom of the header (the horizontal support beam above the opening).
- Headroom: Measure the distance from the top of the opening to the ceiling or the lowest obstruction. Standard doors require 12 inches of headroom, while high-lift doors may need 18-24 inches.
- Side Room: Measure the distance from each side of the opening to the nearest wall or obstruction. Standard installation requires 3.75 inches on each side, though some doors may need more.
- Backroom: Measure the depth of the garage from the door opening to the back wall. This ensures adequate space for the door tracks and your vehicle.
Custom Garage Door Considerations: If your garage opening doesn’t match standard sizes, custom doors are available. However, custom doors typically cost more and have longer lead times. Sometimes, modifying the opening to accommodate a standard door size is more cost-effective.
Storm Door Measurements: Weather Protection and Ventilation
Storm doors provide an additional layer of protection against weather while allowing ventilation when desired. They’re installed outside of your main entry door and require specific measurements for proper fit and function.
Standard Storm Door Sizes:
- Width: 32, 34, 36 inches (most common)
- Height: 80, 81, 96 inches
- Some manufacturers offer adjustable width storm doors that can accommodate openings within a specific range
Measuring for Storm Doors:
- Width Measurement: Measure the inside width of the door frame at the top, middle, and bottom. Use the narrowest measurement. Storm doors typically require a precise fit with minimal gaps.
- Height Measurement: Measure from the door sill (bottom of frame) to the top of the frame. Measure both sides and use the shorter measurement.
- Depth Measurement: Measure the depth of the door frame to ensure the storm door will fit properly. Most storm doors are designed for standard 4-5 inch frame depths.
Special Considerations for Storm Doors:
- Check for square by measuring diagonally across the opening
- Ensure the main door opens inward (most storm doors open outward)
- Consider the swing direction to avoid conflicts with adjacent walls, steps, or railings
- Account for seasonal expansion and contraction in the measurements
Full-View vs. Ventilating Storm Doors: Full-view storm doors feature a large glass panel for maximum light transmission, while ventilating storm doors include screen panels for airflow. The measurement process is the same for both types.
Door Frame Measurements: The Critical Foundation
Door frame measurements are often overlooked, but they’re crucial for proper door installation. Understanding the difference between rough openings and finished openings is essential.
Rough Opening Measurements: The rough opening is the opening in the wall framing before any finish materials are installed. It should be larger than the door frame to accommodate the frame, shims, and installation adjustments.
Standard Rough Opening Guidelines:
- Width: Door width + 2-2.5 inches
- Height: Door height + 2.5-3 inches
- For example, a 36-inch door typically requires a 38.5-39 inch rough opening width
Finished Opening Measurements: The finished opening is the final opening size after drywall, trim, and other finish materials are installed. This is typically what you’ll measure when replacing an existing door.
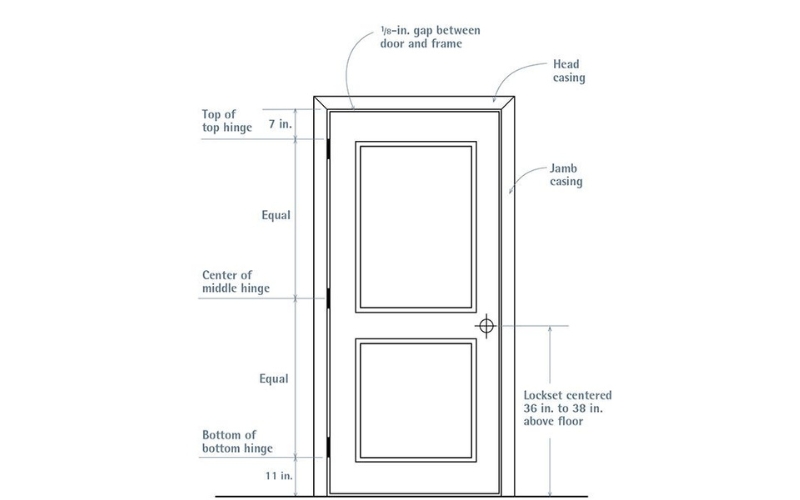
Critical Frame Measurements:
- Width: Measure the inside width of the frame at three points: top, middle, and bottom. Variations may indicate the frame is not square.
- Height: Measure the inside height on both sides of the frame. The door should be about ¼ inch shorter than the frame height.
- Depth/Thickness: Measure the wall thickness to ensure you order the correct jamb depth. Standard depths are 4⅝ inches and 6⅝ inches.
- Square Check: Measure diagonally from corner to corner. If the measurements are equal, the frame is square.
- Plumb and Level: Use a level to check that the frame sides are plumb (vertical) and the top is level (horizontal).
Pre-hung vs. Slab Doors: Pre-hung doors come with the frame attached and require rough opening measurements. Slab doors are just the door panel and fit into existing frames, requiring finished opening measurements.
Measuring Tips and Best Practices
Always Measure Twice: The old carpenter’s adage “measure twice, cut once” applies especially to doors. Double-check all measurements before ordering.
Use the Smallest Measurement: When measurements vary (due to settling, construction tolerances, or wear), always use the smallest measurement to ensure the door will fit.
Check for Square: Out-of-square openings can cause doors to bind or not close properly. Measure diagonally across the opening – equal diagonal measurements indicate a square opening.
Account for Flooring: If you’re planning to install new flooring, account for its thickness in your height measurements. This is especially important for doors with minimal floor clearance.
Document Everything: Keep detailed records of all measurements, including photos of the opening and any unique conditions. This information is invaluable if questions arise during ordering or installation.
Consider Professional Help: For expensive doors like custom wood doors or large sliding glass doors, consider having measurements verified by a professional. The cost of verification is minimal compared to the cost of ordering the wrong size.
Common Measurement Mistakes to Avoid
Assuming Standard Sizes: Not all doors follow standard sizing, especially in older homes or custom construction. Always measure rather than assume.
Forgetting About Trim: When measuring finished openings, account for any trim or molding that might affect the door installation.
Ignoring Swing Direction: Door swing direction affects both measurement and installation. Measure and document which way the door should swing.
Not Checking Level and Plumb: An out-of-level or out-of-plumb opening may require shimming or adjustment during installation, which can affect the final door fit.
Measuring Over Obstacles: Remove any obstacles like trim, weather stripping, or debris before measuring to get accurate dimensions.
Special Considerations for Different Door Types
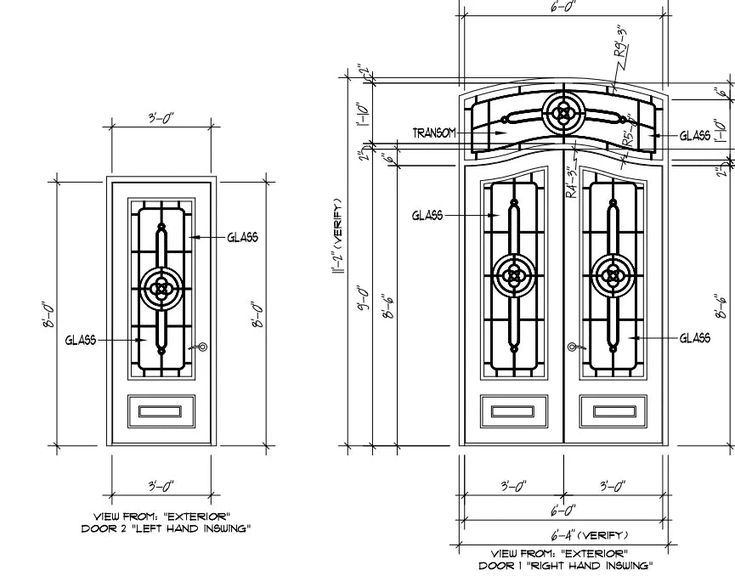
French Doors: These doors typically come in pairs and require measuring both the individual door width and the total opening width. Account for the center mullion if present.
Dutch Doors: These split horizontally in the middle and may have unique height requirements for proper proportion between the upper and lower sections.
Pivot Doors: Large pivot doors require special consideration for the pivot point location and may need non-standard rough openings.
Accordion Doors: These folding doors require track length measurements and may need specific ceiling height clearances.
Conclusion
Accurate door measurements are the foundation of any successful door installation project. Whether you’re dealing with standard interior doors, space-saving sliding doors, large garage doors, or protective storm doors, taking precise measurements ensures proper fit, function, and appearance.
Remember that each door type has its own specific measurement requirements and considerations. Interior doors focus on standard sizing and accessibility, sliding doors require track and clearance considerations, garage doors need substantial structural measurements, and storm doors require precise fitting for weather protection.
The key to success is patience, accuracy, and attention to detail. Take your time with measurements, verify them multiple times, and don’t hesitate to consult with professionals when dealing with expensive or complex installations. Proper measurement and planning on the front end will save you time, money, and frustration throughout your door installation project.
By following the guidelines in this comprehensive guide, you’ll be well-equipped to handle door measurements for any project, ensuring professional results and doors that fit perfectly, operate smoothly, and serve their intended purpose for years to come.