Did you know that nearly 80% of women are currently wearing the wrong bra size? Most of us stick with the same size for years, but our bodies are constantly evolving. Factors like weight fluctuations, exercise routines, aging, and pregnancy mean your “standard” size likely isn’t your true fit anymore.
To ensure you’re getting the comfort and support you deserve, we recommend re-measuring every six months to a year. Here is exactly how to do it at home.
Phase 1: Prepare Your Tools
Before you start, gather these essentials:
- Soft Measuring Tape: To wrap comfortably around your curves.
- A Mirror: This is vital. You need to see your reflection to ensure the tape is perfectly level across your back; if it slants downward or rides up, your measurement will be inaccurate by inches.
- Your “Best” Bra: Wear a non-padded, underwire bra that fits you reasonably well. Avoid sports bras or minimizers, as they compress the tissue and skew the numbers.
Phase 2: The Step-by-Step Measurement
1. Find Your Band Size
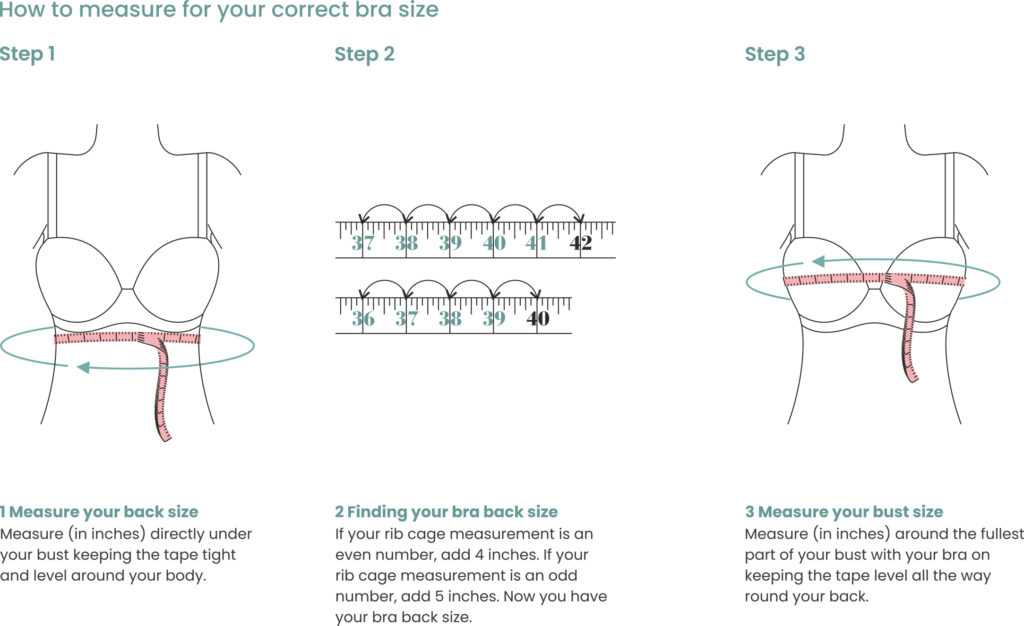
Wrap the measuring tape around your torso, directly under your bust. The tape should be snug against your ribcage but not digging in.
- The Pro Rule: If your measurement is an odd number, round up to the nearest even number. (Example: If you measure 33 inches, your band size is 34).
2. Measure Your Bust
Wrap the tape around the fullest part of your chest. Hold the tape loosely—do not pull it tight or compress the breast tissue. Ensure the tape is parallel to the floor all the way around.
3. Calculate Your Cup Size
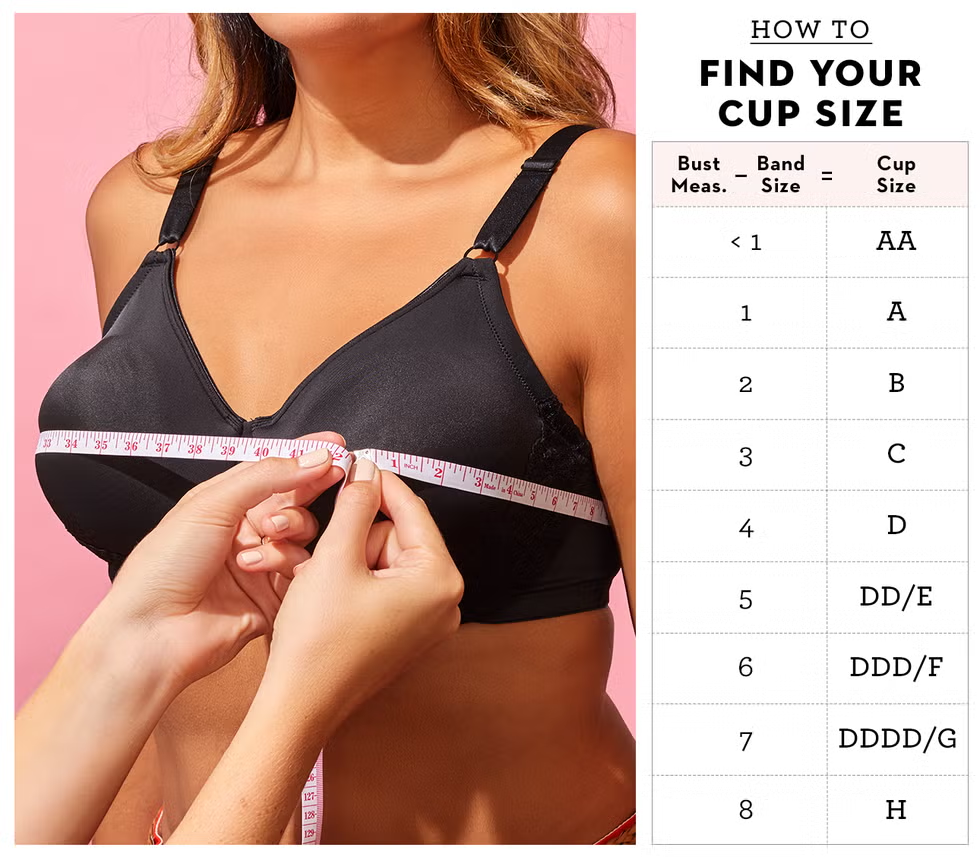
To find your cup size, use this simple formula:
Use the table below to find your match based on the difference:
| Difference (Inches) | Cup Size |
| 0″ | AA |
| 1″ | A |
| 2″ | B |
| 3″ | C |
| 4″ | D |
| 5″ | DD (E) |
| 6″ | DDD (F) |
| 7″ | G |
Phase 3: The 3-Point Fit Check
Even with the right numbers, different brands fit differently. Once you put on a bra, use this checklist to verify the fit:
- The Band: This provides 80% of the support. It should be level and secure on the middle hook. You should be able to slide one finger comfortably between the band and your skin. If it rides up in the back, the band is too big.
- The Cups: Your breasts should be fully contained. If you see “spillage” (the quadra-boob effect), go up a cup size. If the fabric is gaping or wrinkling, go down a cup size. Note the Gore (the center fabric between the cups); it should lie flat against your sternum.
- The Straps: These should stay in place without slipping off or digging into your shoulders. If they dig in, your band is likely too big and isn’t doing its job of supporting the weight.
Phase 4: Matching Style to Your Breast Shape
Measurement is only half the battle; the “shape” of your breasts determines which styles will actually feel comfortable.
- Round: Breasts that are equally full on top and bottom. Most styles work well here, but Balconette or Full-Coverage bras provide the best silhouette.
- Teardrop/Bottom-Heavy: Fuller at the bottom than the top. Plunge bras are excellent for this shape as they prevent gaping at the top of the cup.
- East-West/Side-Set: Breasts that point outward or have a wide space between them. Look for T-shirt bras or Push-up bras with side-support panels to gently bring the tissue toward the center.
- Asymmetrical: It is perfectly normal for one breast to be larger than the other.
- Pro Tip: Always fit the bra to the larger breast. You can then shorten the strap on the smaller side or use a removable pad (insert) to balance the look.
Phase 5: The Essential Bra Wardrobe
A single bra cannot do every job. To maintain breast health and ensure your clothes look their best, every woman should own these four essentials:
- The T-Shirt Bra: Seamless and smooth, designed to be invisible under tight or thin clothing.
- The Multi-way/Strapless: Essential for varied necklines. Look for styles with silicone lining along the band to prevent slipping.
- The High-Impact Sports Bra: To prevent ligament damage during exercise, you need a bra that encapsulates each breast rather than just smashing them down.
- The Non-Wired/Bralette: For low-activity days or lounging, providing light support without the restriction of an underwire.
The right bra lift ensures your clothes drape properly; pair this with perfect sleeve length blazers to ensure maximum comfort.
Phase 6: Maintenance—How to Make Your Fit Last
Even the perfect bra will lose its support if not cared for. Elastic is a “living” fiber that breaks down over time.
- The Rotation Rule: Never wear the same bra two days in a row. The elastic needs 24 hours to “snap back” to its original shape. Rotating between 3–4 bras will triple their lifespan.
- Cold Water Only: Heat is the enemy of elastic. Avoid the dryer at all costs. Hand wash or use a delicate cycle in a mesh bag, then lay flat to dry.
- The “Expiration Date”: Even with perfect care, most bras lose their structural integrity after 6 to 9 months of regular wear. If you find yourself move to the tightest hook just to feel supported, it’s time for a replacement.
Troubleshooting: Sister Sizing
If you find a style you love but the fit is almost there, try Sister Sizing. These are sizes with the same cup volume but different band lengths.
- To go up a band size: Go down one cup size (e.g., if a 34C is too tight in the ribs, try a 36B).
- To go down a band size: Go up one cup size (e.g., if a 34C is too loose in the ribs, try a 32D).
Frequently Asked Questions
How Do I Measure My Bra Size Correctly?
To measure your bra size, measure your underbust and fullest part of your bust.
Why Is It Important To Measure Your Bra Size?
Wearing the wrong bra size can cause discomfort, pain, and impact your posture.
How Often Should I Measure My Bra Size?
You should measure your bra size at least once a year or after significant weight changes.
Can I Measure My Bra Size At Home?
Yes, you can measure your bra size at home using a measuring tape and following the correct steps.
What Should I Do If I Am In Between Sizes?
If you are in between sizes, it is recommended to go for the larger size for more comfort.
Conclusion
Knowing how to measure your bra size is crucial for comfort and support. By following the simple steps outlined in this guide, you can ensure a proper fit and avoid discomfort. Remember to measure regularly and consult with a professional if needed.