How to Read a Tape Measure? Master Precision Now!
To read a tape measure, identify the closest inch mark, then count the smaller marks for fractions. Reading a tape measure accurately is essential for various DIY and construction projects.
Whether you are measuring for a furniture piece or cutting material for a home renovation, understanding how to read the measurements correctly is crucial. By mastering this skill, you can ensure precise and accurate cuts, leading to professional-looking results. With a bit of practice and familiarity, interpreting tape measure markings will become second nature, making your projects more efficient and successful.
This guide will provide you with simple steps to confidently read a tape measure for any task at hand.
Introduction To Tape Measures
Learn how to read a tape measure with these simple steps. Start by identifying the whole numbers and then move on to the fractional measurements. Understanding the markings and increments will help you accurately measure length and width for any project.
A tape measure is an essential tool for anyone who needs to take accurate measurements. Whether you’re a carpenter, a tailor, or a DIY enthusiast, a tape measure is a must-have tool in your kit. Tape measures come in a variety of styles, lengths, and materials, making it easy to find the perfect one for your needs. In this blog post, we will discuss the basics of tape measures, including why they are an essential tool for accuracy and the different types available.
Essential Tool For Accuracy
When it comes to taking accurate measurements, a tape measure is an essential tool. Unlike rulers or yardsticks, which are limited in length, tape measures can be extended to measure longer distances. They also have a locking mechanism that keeps the tape in place once you’ve made your measurement, ensuring that your reading is accurate. Tape measures are used in a variety of industries, from construction to fashion design, because they provide accurate measurements quickly and easily.
Variety In Tape Measures
Tape measures come in a variety of styles, lengths, and materials, making it easy to find the perfect one for your needs. Some tape measures are retractable, while others are flexible. Some are made of metal, while others are made of fabric. The most common length for a tape measure is 25 feet, but they can be as short as 6 feet or as long as 100 feet. Some tape measures even have additional features, such as built-in levels or magnets, that make them even more versatile. No matter what your needs are, there is a tape measure out there that will work for you.
In conclusion, tape measures are an essential tool for anyone who needs to take accurate measurements. They come in a variety of styles, lengths, and materials, making it easy to find the perfect one for your needs. Whether you’re a professional carpenter or just a DIY enthusiast, a tape measure is a must-have tool in your kit. So, if you don’t already own one, it’s time to invest in a quality tape measure and start taking accurate measurements today!
Key Features Of A Tape Measure
When it comes to using a tape measure, understanding its key features is essential for accurate measurements. Let’s delve into the important elements that make up a tape measure, from its blade design and durability to its lock mechanism and belt clip.
Blade Design And Durability
The blade of a tape measure is a crucial component, as it determines the tool’s overall durability and accuracy. Look for a tape measure with a standout blade design that is easy to read and resistant to bending. A durable blade ensures longevity and precise measurements.
Lock Mechanism And Belt Clip
The lock mechanism of a tape measure is what holds the blade in place once it’s extended, allowing for hands-free measurements. A reliable lock ensures stability during use. Additionally, a sturdy belt clip provides convenience by allowing the tape measure to be easily attached to a belt or pocket for quick access on the job.
Understanding The Increment Marks
Understanding the increment marks on a tape measure is essential for accurately reading measurements. By familiarizing yourself with the markings and their corresponding values, you can confidently interpret the measurements and ensure precision in your projects. Embrace the knowledge of tape measure markings to enhance your understanding of measurements.
Inches And Foot Markers
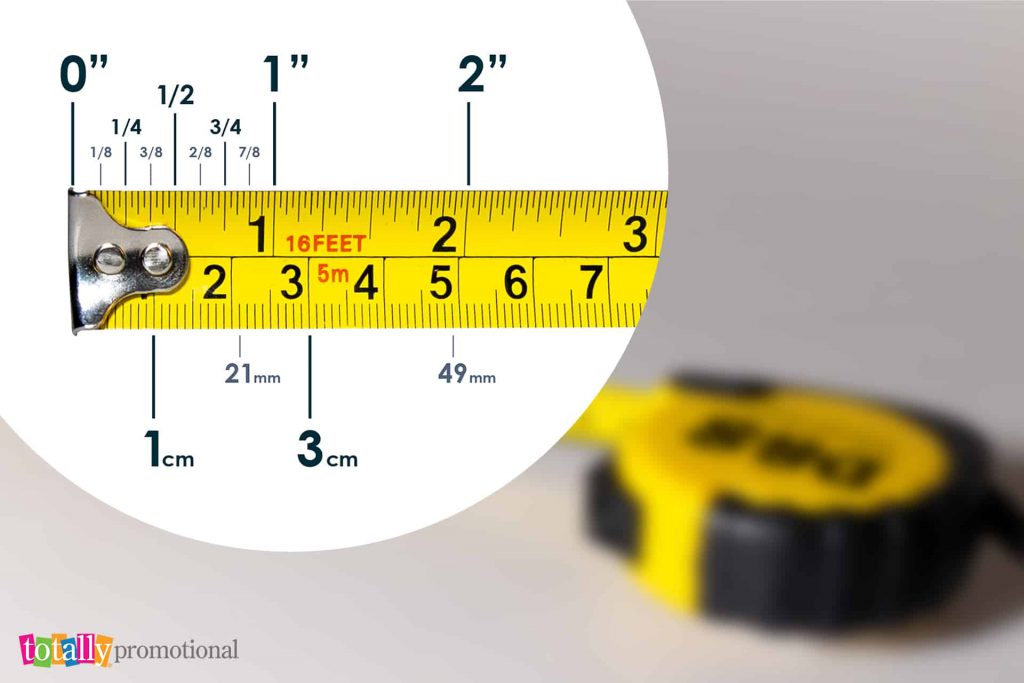
When it comes to reading a tape measure, understanding the increment marks is crucial. The increment marks on a tape measure are used to measure length, width, and height accurately. They consist of different markings that represent specific units of measurement.
The most common increment marks on a tape measure are the inches and foot markers. These markers help you determine the length of an object in feet and inches. The inches are typically represented by the shortest lines on the tape measure, while the foot markers are indicated by longer lines and numbers.
For example, if you are measuring a table and the tape measure aligns with the 3-foot marker and the 6-inch marker, it means that the table is 3 feet and 6 inches long. This information is essential when it comes to various DIY projects, construction work, or even simple household tasks.
Fractional Readings
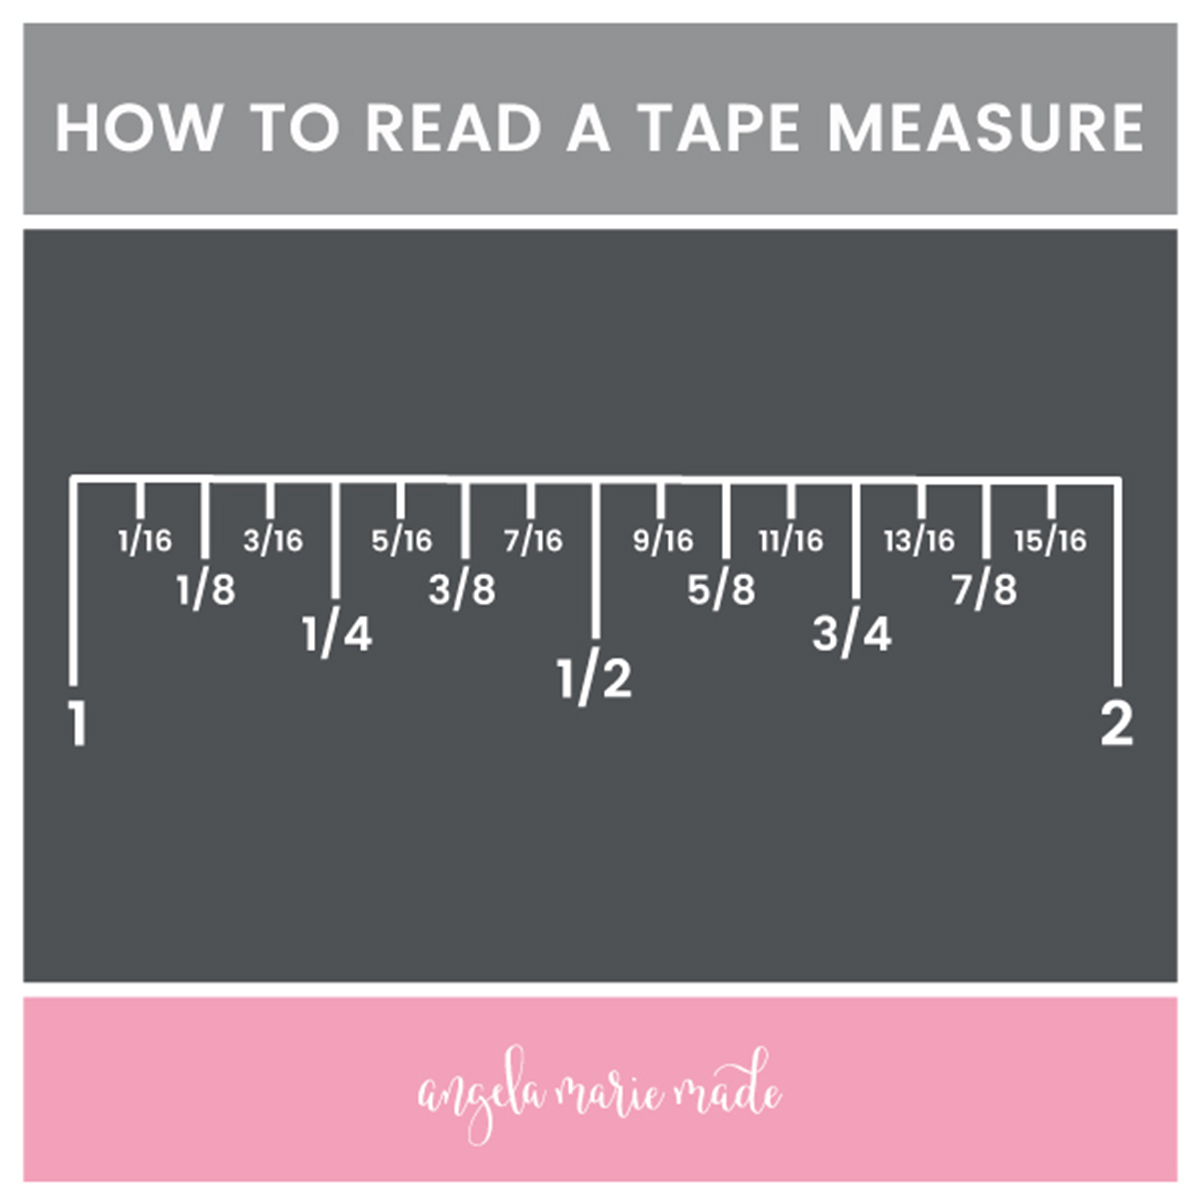
In addition to inches and foot markers, tape measures also have fractional readings. These readings are used when you need to measure objects with precision that goes beyond whole numbers. Fractional readings are indicated by small markings between the inch lines on the tape measure.
For instance, if you see a mark between the 2-inch and 3-inch lines, it represents a fraction of an inch, such as 1/16, 1/8, 1/4, or 1/2. These fractional readings are commonly used in woodworking, where precise measurements are crucial for ensuring a perfect fit.
Understanding how to read fractional readings allows you to measure objects accurately and make precise cuts or adjustments when necessary. It is essential to pay close attention to these markings and familiarize yourself with common fractions to achieve accurate measurements.

Credit: www.totallypromotional.com
Metric Vs. Imperial Tape Measures
When it comes to measuring objects, whether it’s for a DIY project or a professional construction job, having a reliable tape measure is essential. Tape measures come in different types, but the two most common ones are metric and imperial tape measures. Understanding the differences between these two units of measurement can help you choose the right tape measure for your needs.
Differences In Units
Metric tape measures use the metric system of measurement, which is based on units of 10. The main units of measurement in the metric system are centimeters (cm) and meters (m). Centimeters are used for smaller measurements, while meters are used for larger measurements. For example, if you need to measure the length of a small object, such as a pencil, you would use centimeters. On the other hand, if you need to measure the length of a room, you would use meters.
Imperial tape measures, on the other hand, use the imperial system of measurement, which is based on units such as inches (in) and feet (ft). Inches are used for smaller measurements, while feet are used for larger measurements. For instance, if you need to measure the width of a bookshelf, you would use inches. If you want to measure the height of a door, you would use feet.
When To Use Each
Knowing when to use metric or imperial tape measures depends on your location and the project you’re working on. Metric tape measures are widely used in countries that have adopted the metric system, such as most countries in Europe. They are also commonly used in scientific and engineering fields. If you’re working on a project that requires precise measurements and involves metric units, then a metric tape measure is the best choice.
On the other hand, imperial tape measures are commonly used in countries like the United States, where the imperial system is still widely used. If you’re working on a project that requires measurements in inches or feet, such as carpentry or construction, then an imperial tape measure is the most suitable option.
It’s worth mentioning that some tape measures come with both metric and imperial units printed on them, allowing you to use either system of measurement depending on your needs. These dual-scale tape measures can be convenient if you work with both metric and imperial measurements.
Reading The Tape: Step-by-step
Learning how to read a tape measure is an essential skill for DIY enthusiasts, carpenters, and anyone working on home improvement projects. By mastering this skill, you’ll be able to take accurate measurements quickly and effectively. Let’s walk through the process step by step.
Finding The Starting Point
Before you can begin measuring, you need to locate the starting point on the tape measure. This is typically denoted by a metal hook or tang at the end of the tape. Ensure the tape is flush against the object to get an accurate starting point.
Determining Length Accurately
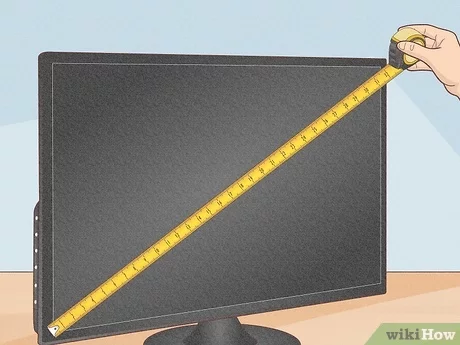
When determining the length, ensure the tape is straight and not sagging to get an accurate measurement. Read the measurement at the point where the tape end lines up with the object’s edge. Avoid any bends or curves in the tape for precision.

Credit: angelamariemade.com
Common Mistakes To Avoid
When reading a tape measure, it’s crucial to steer clear of common errors that can lead to inaccurate measurements. By being aware of these pitfalls, you can ensure precise results every time.
Misreading Between The Lines
One of the most frequent mistakes is misinterpreting the markings on a tape measure, especially the smaller increments. This can result in measurement errors that impact the overall accuracy of your project.
Ignoring The ‘true Zero’
Another critical error is disregarding the ‘true zero’ point on the tape measure. Failing to start your measurements from this reference can lead to incorrect readings and inconsistencies in your work.
Advanced Tips For Precision
Mastering advanced techniques can enhance your accuracy when reading a tape measure.
Using The Diamond Markings
Utilize the diamond markings for precise measurements on lumber.
Measuring Internal Dimensions
For internal spaces, account for the tape measure’s thickness.
Maintaining Your Tape Measure
When it comes to Maintaining Your Tape Measure, it is crucial to ensure its accuracy and longevity. Here are essential tips to help you keep your tape measure in top condition:
Routine Cleaning
- Wipe the tape with a clean, damp cloth.
- Remove any dirt or debris for accurate measurements.
- Avoid using harsh chemicals that could damage the markings.
Storage Best Practices
- Store your tape measure in a dry place to prevent rust.
- Avoid exposing it to extreme temperatures or direct sunlight.
- Keep it away from moisture to maintain its accuracy.
Practice Makes Perfect
Exercises For Improvement
To enhance your skills, try measuring various objects at home.
Real-world Applications
Apply your tape measure knowledge when DIY-ing or crafting projects.

Credit: www.wikihow.com
Frequently Asked Questions
How Do You Read A Tape Measure?
To read a tape measure, locate the biggest marking which represents a whole inch. The smaller lines between the inch marks represent fractions of an inch.
What Are The Different Units Of Measurement On A Tape Measure?
The most commonly used units of measurement on a tape measure are inches, feet, and yards. Some tape measures also have metric units of measurement like centimeters and meters.
How Do You Measure Length With A Tape Measure?
To measure length with a tape measure, hold the tape measure at one end and extend it to the other end. Make sure the tape measure is straight and tight, then read the measurement where the tape meets the object.
What Are The Different Types Of Tape Measures Available?
There are various types of tape measures available such as retractable tape measures, long tape measures, digital tape measures, laser measures, and measuring wheels.
Can A Tape Measure Be Calibrated?
Yes, a tape measure can be calibrated. Use a known accurate ruler to check if the markings on the tape measure are accurate. If there are discrepancies, you can adjust the tape measure accordingly.
Conclusion
In mastering the tape measure, you’ve gained a valuable skill for countless projects. Understanding its markings and using it accurately can make a world of difference. By following the tips and techniques outlined in this guide, you’ll be well-equipped to tackle any measurement task with confidence and precision.
Happy measuring!


