Are you wondering if your water is hard or soft? Knowing your water’s hardness is key to protecting your plumbing, appliances, and even your skin.
Hard water can cause buildup, reduce soap’s effectiveness, and leave stains on dishes and clothes. But how do you find out the hardness level of your water? Measuring water hardness might sound complicated, but it’s easier than you think. Whether you want a quick check or an accurate reading, this guide will show you simple, effective ways to test your water at home.
Keep reading to learn how to measure water hardness and take control of your water quality today.

Credit: www.ysi.com
Water Hardness Basics
Understanding water hardness is key before measuring it. Water hardness affects daily life and appliance efficiency. It refers to minerals dissolved in water, mainly calcium and magnesium. These minerals come from natural sources and affect water quality. Knowing the basics helps in choosing the right testing method.
Hard water can cause scale buildup in pipes and reduce soap effectiveness. Measuring hardness helps protect plumbing and improve cleaning. This section explains what causes hard water and the units used to measure it.
What Causes Hard Water
Hard water forms when water passes through rocks and soil. It absorbs minerals like calcium and magnesium. These minerals dissolve into the water and increase hardness. Limestone and chalk are common sources of these minerals. Hard water is natural and common in many areas. It is not harmful but can cause problems in homes.
Units Of Measurement
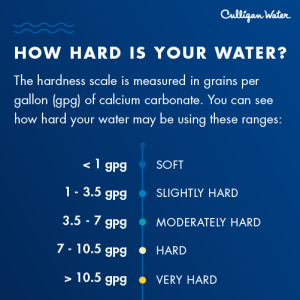
Water hardness is measured in several units worldwide. The most common are parts per million (ppm) and milligrams per liter (mg/L). Both units show the amount of minerals in water. Another unit is grains per gallon (gpg), used mainly in the United States. One grain per gallon equals 17.1 ppm or mg/L. Water hardness levels can be soft, moderate, hard, or very hard.

Credit: nelsonwater.com
Common Testing Methods
Testing water hardness helps identify mineral levels in your water supply. It guides treatment choices and protects appliances. Several common methods exist for testing water hardness at home or in the field. Each method offers different levels of accuracy and ease. Choose based on your needs and resources.
Test Strips
Test strips are thin paper strips coated with chemicals. Dip a strip into water for a few seconds. Then, compare the strip’s color change to a chart. This method is quick and simple. It provides an approximate measure of hardness. Test strips are affordable and widely available.
Titration Kits
Titration kits use a chemical reaction to measure hardness. Add drops of a reagent to a water sample. Count the drops until the color changes. This number shows the hardness level. Titration kits are more accurate than test strips. They require careful handling and some practice.
Diy Soap Test
The DIY soap test uses common household soap. Fill a clear jar halfway with water. Add a small amount of pure soap, like Dawn dish soap. Shake the jar and watch for bubbles. Few bubbles mean hard water. Many bubbles mean soft water. This test is easy but not very precise.
Step-by-step Testing Guide
Testing water hardness is simple and helps you understand your water quality. Follow these clear steps for accurate results. This guide covers easy methods anyone can try at home or work. Each step explains what to do and how to read your results. Let’s begin with collecting the water sample.
Collecting Water Samples
Use a clean container to collect water. Let the water run for a few minutes first. This removes any standing water in pipes. Fill the container about three-quarters full. Avoid touching the inside of the container or lid. Label the sample with the date and location. Keep the sample cool if testing is delayed.
Using Test Strips Correctly
Dip a water hardness test strip into the sample. Hold it in the water for the time shown in instructions. Remove the strip and shake off excess water. Wait for the strip to change color. Compare the color on the strip to the chart provided. Match colors carefully for accurate hardness levels. Note the hardness level in parts per million (ppm).
Performing A Titration Test
Fill the test tube with the water sample up to the marked line. Add a few drops of the titration reagent from the kit. Shake or swirl the tube gently after each drop. Count the drops until the water changes color. The number of drops equals the hardness level. Check the kit’s guide to convert drops to ppm. This method gives precise hardness results.
Conducting The Soap Test
Fill a clear jar halfway with the water sample. Add one drop of pure liquid soap, like Dawn. Close the jar tightly and shake it well for 10 seconds. Watch the bubbles and foam that form. Lots of bubbles mean soft water. Few bubbles and cloudy water show hard water. This test is quick and uses common household items.
Interpreting Results
Understanding the results of your water hardness test is crucial to knowing your water quality. Interpreting these results helps you decide the next steps for your water use or treatment. This section breaks down how to read your test outcomes clearly and simply.
Reading Color Charts
Test strips or kits usually come with a color chart. After dipping the strip in water, match its color to the chart. Each color shows a different hardness level. Look carefully because colors can be close. Use natural light for the best match. This step gives a quick visual estimate of hardness.
Understanding Ppm And Gpg Values
Water hardness is measured in parts per million (PPM) or grains per gallon (GPG). PPM means how many parts of minerals are in one million parts of water. GPG is another unit, often used in the U.S. One GPG equals about 17.1 PPM. Low values mean soft water. Higher values show hard water. Knowing these numbers helps you understand your water’s impact on pipes and appliances.
When To Consider Water Treatment
Water hardness above 120 PPM or 7 GPG is usually hard. Hard water can cause scale buildup and reduce appliance life. If your test shows high hardness, think about water softeners or conditioners. Treatment improves water quality and protects your plumbing. Regular testing keeps track of changes in hardness over time.
Additional Testing Options
Testing water hardness can be done using various methods. Besides simple home kits, there are other reliable options. These provide more detailed and accurate results. Exploring additional testing options helps ensure you understand your water quality well.
Professional Laboratory Analysis
Sending a water sample to a professional lab offers precise results. Labs use advanced tools to measure calcium and magnesium levels. Results come with detailed reports explaining water hardness. This method suits those needing exact data for treatment decisions.
Municipal Water Reports
Many city water suppliers publish annual water quality reports. These include water hardness data for your area. Checking these reports saves time and effort in testing. Reports are usually available online or by request from your water provider.
Free Test Strip Resources
Some organizations offer free water hardness test strips for homeowners. These strips are easy to use and provide quick results. Simply dip the strip into water and compare the color change. Free resources help people test water without extra cost.
Tips For Accurate Measurement
Accurate measurement of water hardness is essential for understanding your water quality. It ensures you get reliable results to decide on treatment or adjustments. Small errors can lead to wrong conclusions about your water’s hardness level. Follow these simple tips to improve accuracy and trust your test results.
Avoiding Contamination
Always use clean containers to collect water samples. Avoid touching the inside of test tubes or strips with your hands. Rinse all tools with distilled water before testing. Do not mix samples from different sources. Contamination can cause false readings and reduce test reliability.
Proper Storage Of Test Kits
Store test kits in a cool, dry place away from direct sunlight. Keep the kits sealed tightly to prevent moisture and dust. Check expiration dates regularly and replace old kits. Improper storage can damage reagents and lead to inaccurate results.
Testing Frequency Recommendations
Test water hardness at least once every three months. Increase frequency if you notice changes in water taste or appliance performance. More frequent testing helps track hardness trends over time. Regular checks allow you to react quickly to water quality changes.
Credit: hallswater.com
Frequently Asked Questions
How Can I Test The Hardness Of My Water At Home?
Test water hardness at home using test strips or a titration kit. Dip the strip in water and compare colors to the chart. For a quick check, mix water with dish soap; few bubbles indicate hard water. Alternatively, request a water quality report from your local water authority.
Is 120 Ppm Hard Water?
Water with 120 ppm hardness is moderately hard. Hard water typically starts at 121 ppm and above.
Is 30 Considered Hard Water?
A hardness level of 30 ppm (parts per million) is considered moderately hard water. It may cause minor scaling issues.
Can You Use Dawn Dish Soap To Test For Hard Water?
Yes, you can use Dawn dish soap to test for hard water. Add a drop to water, shake, and observe bubbles. Fewer bubbles indicate harder water.
Conclusion
Measuring water hardness helps protect your plumbing and appliances. Use simple test strips or a titration kit for accurate results. The soap test offers a quick, easy way to check at home. Knowing your water hardness level guides you in choosing the right treatment.
Regular testing keeps your water quality safe and your home running smoothly. Start measuring today and enjoy cleaner, softer water tomorrow.